Friday, June 17, 2022

Mmmmango Season!

Ataulfo Mangoes at different degrees of ripeness
Marvelous mangoes are nearing the end of their season and can be found at good prices by the case. I prefer the Ataulfo mango, slightly smaller fruit with a flat stone and buttery, sweet, smooth flesh. For information and a cutting demo with photos, check out my Featured Post ... "Exotic Ataulfo Mangoes" from April 2016.

Easy dicing method

Don't worry about having too many mangoes ripening at once. When they are on sale, I always purchase different degrees of ripeness and more than I can use fresh. I love having a bag of diced, frozen Ataulfo Mango in my freezer for that quick mango 'fix' or new found recipe. 

To freeze mango; line a bake sheet with parchment paper or plastic wrap. Then follow the preparation and dicing methods in my previous Blog Post, Exotic Ataulfo Mangoes. Spread out the diced mango on the bake sheet so they are in a single layer and will freeze in individual cubes. When fully frozen, peel mango off of the parchment paper, break apart if necessary and move to a zip type freezer bag. The majority of the frozen fruit should be individual cubes, not a frozen lump. I have purchased frozen mango in the past and was so disappointed with the flavor and quality of the fruit that once was enough. Now every year I get a few cases of the Ataulfo Mangoes when in season, on sale and I know I have a high quality product on hand.

Below is a refreshing, fast, super delicious, gluten-free, vegetarian recipe with quinoa (pronounced keen-waa) and mango... fresh mango is best but if you have frozen to use up, just defrost it first so it does not make the dish too watery. 

'Quinoa' is a good source of plant protein and fiber. It is a gluten-free, whole grain carbohydrate, as well as a whole protein, meaning it contains all nine essential amino acids. It is light and fluffy in texture but has the 'whole grain' ability to fill you up.

CURRIED QUIONA WITH MANGO       Yield: 6 cups
Served as a side, light lunch, in a wrap or lettuce cups ... fast and refreshing!

1 cup quinoa
2 cups water
2 Tbsp. dry minced onion
1 Tbsp. chicken bouillon powder 
Cool quinoa and gently toss with remaining ingredients

2 tsp. Madras curry powder
1/2-3/4 tsp. sea salt
1/4 tsp. turmeric
 
Dressing:
2 Tbsp. avocado oil
1 Tbsp. white wine vinegar
3/4 tsp. Madras curry powder
1/8 tsp. dry mustard
sea salt and freshly ground pepper

Assembly:
1 cup diced Ataulfo mango
1 cup diced English cucumber
1/4 cup sliced green onions
2 cups mixed mesclun greens
6-8 gluten-free wraps or lettuce cups, optional

Rinse quinoa with cold water to remove the bitter tasting compound that coats the tiny seeds, place in a medium pot with water, dry onion, chicken bouillon, curry powder, sea salt and turmeric. Place over medium heat, bring to a boil. Turn the heat to low, cover and gently simmer for 15 minutes. Remove from the heat and fluff with a fork, cover and let sit another 2-5 minutes. Transfer to a medium bowl and spread out to cool.

Meanwhile make the dressing: whisk the oil, wine vinegar, curry powder and dry mustard in a small bowl to blend. Season dressing with salt and pepper to taste.
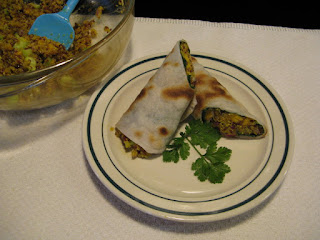
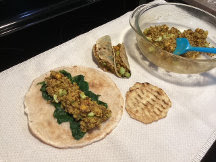
Curried Quinoa Wraps
Assemble the salad: to the cooled quinoa add the diced mango, cucumber, green onions and dressing. Gently toss to coat.

Serve as a side dish or for a light lunch serve on a bed of mesclun greens or with lettuce cups. For wraps: divide the greens between 6-8 wraps, spoon the quinoa mixture and wrap firmly closing one or both ends.

Until next time ... Bon Appétit!

Recipe by Sally Rae
Photos by Sally Rae

Thursday, June 9, 2022

What is Quinoa?

Organic Quinoa: Ivory, Red & White, Tri-Color

'Quinoa' (pronounced keen-waa) was a staple in the diet of the ancient Incas. It is a whole grain that is now rapidly growing in popularity due to its many health benefits.  

Quinoa is a flowering plant of the amaranth family. It is an annual plant grown as a crop primarily for its edible seeds. Though technically a seed, Quinoa is classified as a whole grain and is a good source of plant protein and fiber. It is a gluten-free, whole grain carbohydrate, as well as a whole protein, meaning it contains all nine essential amino acids. Quinoa cooks up much faster than other grains and when cooked the seeds expand rapidly, become tender but chewy and expel spirals that give a slight crunch. Cooked Quinoa becomes light, fluffy and nutty; the ideal canvas to showcase intense flavors, rich textures and your favorite veg, meats, dressings and sauces. Plus it provides 8 grams of protein, 5 grams of fiber and 220 calories per every 1 cup cooked. Over all it has 3-4 times more nutrients than brown rice. It is light and fluffy in texture but has the 'whole grain' ability to fill you up.

It comes in different varieties with different colors as well ... with white, red and black being most common. Most stores carry the common white quinoa but I found the color mixtures also available in a mix of red and white and a mixture of three colors at our local grocery stores. 

  • White Quinoa is the most readily available and is labeled simply Quinoa or sometimes Ivory Quinoa. It is very light and fluffy and the least bitter of the three. 
  • Red Quinoa tastes like white but when cooked remains slightly more al dente, therefore has a bit more chewy texture and holds its shape better in cold salads.
  • Black Quinoa is harder to find but like red quinoa maintains its shape better than white when cooked and it tastes nuttier.
  • Tri-Color Quinoa as the name suggests is a mixture of white, red and black into one bag.

Quinoa has a bitter, unappetizing coating called 'saponin' which occurs naturally as it grows to protect it from being eaten by wildlife. There is an easy 'fix' to removing this bitter, soapy flavor of the saponin coating ... by rinsing the quinoa grains thoroughly in cold water before cooking in any method. To do this, use a fine mesh sieve so you don't lose any of the tiny grains down the drain. Let the cold water run over the grains shaking the sieve and using your hand to move them around so all the grains get a good rinse.

Stove-top Quinoa with Curry
How to Cook Stove-top Quinoa - rinse the quinoa thoroughly. The basic ratio is 2 cups liquid to 1 cup quinoa. You can use water with a bit of salt, dry white wine or broth for flavor. Add liquid to the pot then add the rinsed quinoa. Turn the heat to high and bring the liquid to a boil, then turn down the heat, cover the pot and simmer gently for 15-20 minutes. The liquid should be absorbed and the quinoa will have sprung little spirals which is the germ of the kernel indicating it is done. Remove from the heat and give it a fluff with a fork to loosen it up. Then cover the pot and let it sit for another 2 minutes. At this point, you can serve it hot or spread it out on a bake sheet to cool for salads or wraps.

How to Cook Quinoa in a Rice Cooker - rinse the quinoa thoroughly. Grease the inside of the rice cooker with butter or cooking spray. Add 2 cups liquid to 1 cup quinoa and turn the rice cooker to the white rice setting. When the rice cooker lets you know the cycle is complete, open it and fluff the quinoa with a fork. Unlike rice the quinoa cannot remain in the rice cooker on 'keep warm', it will go mushy. So, remove the cooked quinoa from the rice cooker right away.

How to Cook Quinoa in an Instant Pot - *NOTE: this method is the exception and uses equal portions of liquid to quinoa. Rinse the quinoa thoroughly. Grease the inside of the IP with butter or cooking spray. Add quinoa and liquid in the ratio of 1 cup liquid to 1 cup quinoa. Close and lock the lid, set the cook time for 1 minute. Allow the steam to release naturally. Open the IP, fluff the quinoa and remove from the IP right away.

Curried Quinoa Wraps
Using quinoa as the base in any grain bowl gives the dish extra protein, extra flavor and texture. It is quick to whip up as a side dish and absorbs flavors of any meat, vegetables or sauces. Try the Tri-Color Quinoa in salads, wraps or lettuce cups ... it adds a bit more chewiness, color and absorbs the dressing so it is in every bite.

Until next time ... Bon Appétit!

Photos by Sally Rae
Cooking method research from The Food Network

Thursday, March 31, 2022

Have You Tried Chimichurri?

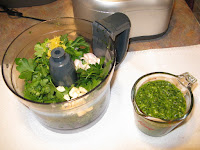
Chimichurri Mise en Place - fast and simple!
Chimichurri is a fresh condiment originating from Argentina and Uruguay made from finely chopped fresh parsley, oregano, garlic, olive oil, red pepper flakes and red wine vinegar. It is a bright, tangy, fresh sauce traditionally used on grilled meats, but is good on almost anything and everything!! Try it tossed with steamed vegetables, with chicken, fish or shrimp, drizzled over eggs, used as a dressing for pasta salad, drizzled over pizza after baking, used as a sandwich spread with (or without) mayo. The possibilities are endless ... and it takes only 10 minutes to make!

Chimichurri - start to finish

Chimichurri is not Pesto, they may look similar ... they are both herbaceous, green sauces made with olive oil but they are not at all similar in flavor. Also, Chimichurri has no nuts or cheese making it a perfect, condiment for nut and dairy sensitivities, vegetarian, low carb, gluten free and Paleo diets.

 Some Chimichurri recipes use cilantro instead of oregano and some add smoked or hot paprika and shallots which are not authentic. I prefer the cilantro version for vegetables, salads and pizza, and the authentic oregano version for grilled meats. Although, the flavor of cilantro is an acquired taste for many.

Creamier sauce
For a creamier sauce, add everything into the food processor then pour the olive oil in while the machine is running. This will thicken the sauce slightly and blend it to creamy looking and smooth.

With grocery prices on the rise, why not add cilantro and Italian parsley to your herb garden this year? Chimichurri can be made all summer and frozen for future use to liven up your winter meals. It can be stored in a covered container in your fridge for up to 5 days or packed in small jars and given as gifts marked with the preparation date, best before date and freezing instructions.
If you have never heard of ... or tried this tangy, fresh sauce, what are you waiting for? 

Chimichurri with Cilantro        Yield: about 1 cup
1 cup fresh cilantro *see Notes below
Chimichurri drizzled over Vegetarian Pizza
1 cup Italian (flat leaf) parsley *see Notes
1 shallot 
3 large cloves garlic
Zest of 1 lemon
2 Tbsp. red wine vinegar
1/2 tsp. sea salt
1/4 tsp. coarse ground black pepper
1/4 tsp. red pepper flakes, optional
1/4 to 1/2 cup olive oil

Thoroughly rinse the cilantro and Italian parsley several times. Pick out any bruised or yellow leaves, remove heavy stem ends. Peel shallot and garlic, roughly chop. Combine all ingredients except olive oil in a food processor and pulse to reduce the bulk of the herbs. Slowly pour in the olive oil and pulse to desired consistency. Stop periodically and scrape down the sides of the processor bowl. Allow to rest for at least 15 minutes for the flavors to marry before using.
 
Fresh and packaged for the freezer
Store in an airtight container in the fridge for up to 5 days. For the freezer; package in 1/4 to 1/2 cup portions or freeze in an ice cube tray. Then store in airtight containers in the freezer for up to 1 year. Thaw only the amount needed.

**CHEF'S NOTES:
Do not use dried herbs for this recipe, only fresh will do!
One 'bunch' of fresh cilantro or Italian parsley is about 1-1/2 cups each.

Until next time ... Bon Appétit!

Recipe by Sally Rae
Photos by Sally Rae

Monday, March 7, 2022

Thai Double Blue Butterfly Pea

The 'Blue Butterfly Pea' is an edible, blue flowered, vining plant, native to Southeast Asia. The vines are smothered in dazzling indigo petals. The flowers are used as a natural food dye and soothing tea to calm the nerves. The double flowered type seed I grew was found in Thailand, where blooms are used to dye everything from teas to rice and desserts. Butterfly pea has a mild, floral flavor and a most intense natural color making it a novelty culinary ingredient.

At the beginning of Covid lock downs in 2020, I received 'The Baker Creek Seed Catalogue' as a gift. I was really impressed at their speed of delivery, impressive selection of rare and unusual seeds and free shipping! I published a Blog March 2020 with my selection of seeds. Since then I have grown and tried all of the seeds, some not very easy to start or grow and as one of my clients said, "... these seeds are rare ...and difficult to grow is one reason why." Also this year shipping is no longer free, there is now a set rate charged.

Grown in a sheltered space

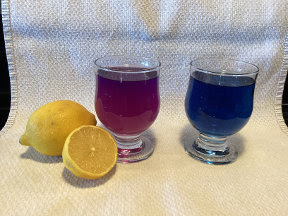
Previous to finding the seeds in this catalogue, I had been unsuccessfully searching for 'Blue Butterfly Pea' flowers for tea and to color food and beverages. When brewed into a tea, it is a beautiful blue color ... add lemon juice and the color transforms in front of your eyes to pink. Desserts, beverages, ice cubes, hard boiled eggs, pasta and rice can also be colored blue with these incredible little flowers. 

Blue Butterfly Pea tea changes color when lemon juice is added

You can purchase the dried flowers online in various forms; teabags, dried whole flowers and powdered. Or grow the plants from seed, save and dry the flowers for special occasions or package and give as gifts to your foodie friends... or use them fresh.

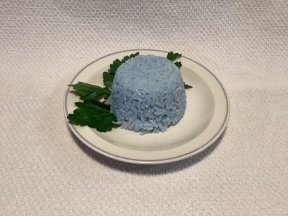
I have seen 2 different methods to color white rice: add the rice and water to a rice cooker and add 3-4 fresh flowers, stir then turn the rice cooker to the 'Cook' position ... or to use dried flowers ... steep the tea, cool; add rice and use the cooled tea instead of water. The steeped, cooled then strained tea method was used to cook this beautiful Blue Thai Jasmine Rice. 

Blue Butterfly Pea Tea used to cook Thai Jasmine Rice
Butterfly Pea is a tropical perennial that can be grown as an annual in cooler climates. It is most commonly started from seed but I found it spotty to germinate even after scarifying the seeds and soaking over night. My efforts and frustration were worth the effort. I was thrilled to grow, collect and dry a small jar of the flowers for my culinary use. The plants prefer full sunlight and will trail freely along the ground or up a trellis or stakes. A beautiful, rewarding gardening and culinary experience!

Until next time ... it sure feels like Spring is in the air, looking forward to garden season!
Bon Appétit!

Photos by Sally Rae 

Sunday, January 30, 2022

Winter Garden and January Harvest

Snow and cold, unusual for the Island ... Dec. 30, 2021
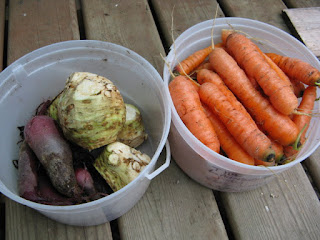
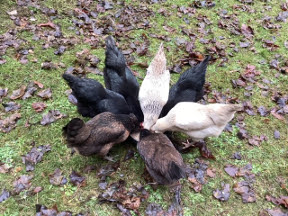
Finally the weather has warmed up after 3 weeks of snow and cold that started on Christmas Eve, I checked the winter garden crops last week. The cabbage heads outer leaves were slimy from the -15C and didn't fare well through the cold, even though I had them covered with tarps. They are edible with all the damaged leaves removed but I've used them as chicken food. The hens went crazy for the fresh, crisp vegetables!! Great food and entertainment for them in this weather. The kale did well and is now very sweet from the cold. I pulled back the maple leaves and straw mulch from the root crops and was really surprised to see the beets are still okay. I dug 3 celeriac roots, a gallon pail of carrots and the few beets that were left in the garden. With the warmer temperatures the carrots are starting to grow little 'hairy' roots so I piled the mulch back on top of the remaining 2 rows for harvest in 3-4 weeks or when I need them.
January Harvest - beets, celeriac and carrots

The garlic shoots are poking through the mulch and even the strawberries are showing signs of new life. I had to pull some perennial weeds and grasses to try and stay ahead of them. Once the snow and ice was gone and the temperatures above 0C we had a good stretch of fog. It was cold and damp but at least it wasn't rain, so digging the root crops was a bit easier than if the soil was really wet. Not much can compare to the flavor and crunch of fresh, organic carrots harvested in January! After growing up on the prairies, I still marvel at the food I can grow here year round! I've put in my seed orders for the garden this year and am starting to plan and gear up for Spring!

On a sad note, our eagles' nest blew out of the tree in two crazy wind storms we had in December. The eagle pair was back in October and November bringing more branches to the nest. They were back early in January, sitting in the perch tree I'm sure wondering, where the heck is our home? We hear the eagles around and sometimes they come to the perch tree but so far there has been no activity to rebuild the nest in the same location. At this point it is too late in the season for them to start building. We will miss the close entertainment of Nature they gave us. The extreme weather conditions have been breaking records and making headline News for more than a year now. Every season has had an extreme, difficult result. Welcome to the new normal...

Until next time ... Stay safe, warm and dry,
Bon Appétit!

Photos by Sally Rae

Tuesday, December 21, 2021

Seasons Greetings

Another Covid Christmas

British Columbia has taken a beating this year... with our summer Heat Dome, too many Atmospheric Rivers to count, Cyclone Bombs, wild fires then severe flooding and landslides... and that was just the tip of the iceberg! We are now facing a Polar Vortex for Christmas with freezing rain, snow and minus temperatures. Not something we usually get here on the Island. Add in raging Covid case numbers and it has been a crazy, record breaking year.

We have so much to be thankful for... to live on Denman Island where many of the weather hardships were not an issue. 

Seven hens, a cold afternoon and a bowl of warm mash
As for Covid, we stay home a lot and are lucky to have a big property, winter garden, a warm, dry house with fur and feathered companions to occupy our time.

The hens have been such a joy in my life. With the cold weather I've been making them a warm mash each afternoon. Even the two shy birds get their head in the bowl with everyone else. It is heartwarming to watch.

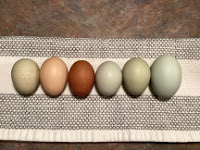
Part of the Joy - beautiful eggs!


Even though the temperatures are dropping, the hens continue to lay their beautiful assortment of colored egg shells, from a yellow/green with speckles, pale pink/brown, dark/dark brown, pale blue, mint green and blue. 

So here we are ... looking at another quiet, Covid Christmas ahead of us. Much gratitude and appreciation for where we live and the type of lifestyle we have. Caring, helpful neighbors, technology for winter entertainment and to stay connected with friends and family ... plenty of food, water and firewood. We are beyond grateful!

From my home to yours, I wish you a safe, joyful Christmas and all the Best in 2022!

Until next year ... Stay safe, warm and dry ...
Happy Holidays and Bon Appétit!

Photos by Sally Rae

Wednesday, December 1, 2021

Soup Recipe Switch Up

Sunshine Squash in the garden
My 'Featured Post' last month, 'Thai Sweet Potato Soup'... highlights one of my favorite flavor combinations and a soup recipe all served up in a bowl of comfort! Last week I had time to make a few recipes to fill the freezer. I had a great harvest of Sunshine Squash and wanted to use them for squash soups. The first go-to was from my cookbook that starts with a big pan of 'Curry Roasted Squash' from page 270+271 of 'For the Love of Food'. The left over roasted squash becomes 'Creamy Curried Squash Soup'. Yummmm!!

There were no sweet potatoes in my cold storage but lots of winter squash, so I decided to experiment and transform last months 'Feature Recipe'. The soup switch up became 'Thai Squash Soup' and was a great success. Sunshine, Buttercup and other Kabocha type squash are what I prefer for their dense, sweet flesh and vibrant color. Give it a try and let me know what you think...

THAI SQUASH SOUP      Yield: 8 servings
This soup is easily made vegetarian by using vegetable stock and omit the whipping cream. If you will be freezing the soup, do not add the whipping cream.

1 large Kabocha type squash; peeled, seeds removed and 3/4"diced (8-10 cups diced)
1 onion, fine diced
3 cloves garlic, peeled and minced
1 generous Tbsp. organic coconut oil
1 1/2 Tbsp. freshly grated ginger
5-6 cups flavorful chicken or vegetable stock
1/8-1/4 tsp. cayenne pepper
Thai Squash Soup

1 fresh lemongrass stalk
2 Kefir lime leaves
salt and black pepper to taste
1 can (400 ml) unsweetened coconut milk
1/2-1 Tbsp. fresh lime juice, optional
1/2 cup whipping cream, optional
Finely chopped cilantro or chives for garnish

In a large stock pot melt coconut oil over medium heat. Add the chopped onions, garlic and ginger. Sauté until softened and fragrant but do not brown. Clean the outer leaves then pound the bulb end of the lemongrass with a skillet or flat meat tenderizer. Add the stock, cayenne, lemongrass, Kefir lime leaves, salt, pepper and diced squash. Bring to a boil, reduce heat and simmer, partially covered for 20-30 minutes until the squash softens.Stir occasionally.

Remove the lemongrass and Kefir lime leaves. Use an immersion blender and purée the mixture until smooth. Whisk in the coconut milk and bring back to a simmer, stirring often... do not boil!

Stir in the whipping cream if using. Taste and adjust the seasoning if necessary with lime juice, powdered ginger, cayenne, salt and pepper. Ladle soup into servings, sprinkle with finely chopped cilantro or chives.

Until next time ... Stay safe, warm and dry,
Bon Appétit!

Recipe by Sally Rae
Photos by Sally Rae